使用的服务
- 域名:阿里云
- 服务器:腾讯云
- SSL 证书:腾讯云
Nginx 子域名配置
域名介绍
- 顶级域名,又称一级域名,比如
.com .org .cn
- 二级域名,就是在一级域名前再加一级,比如
muycode.com
- 二级域名以上级别的域名,统称为子域名,比如
book.muycode.com
多说一句:有人认为 xxx.com 是一级域名,虽然是错误的,但可以理解。对于购买或使用者来说 xxx.com 就相当一级域名,但是从真正的域名分级看,属于二级域名
Nginx 子域名配置
我们在部署项目时,通常会希望使用 book.muycode.com 或 blog.muycode.com 类似的子域名。
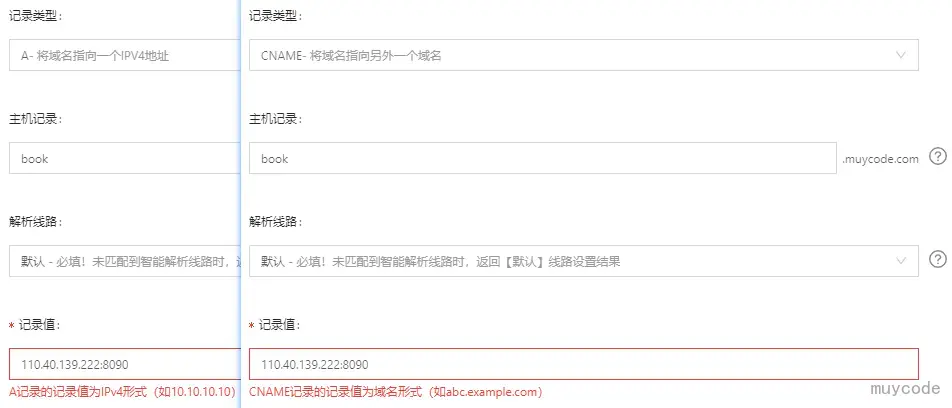
刚开始可能会想到使用不同的端口来区分,但是,在解析域名时,是不能通过 IP:port 的方式来配置的,如下图:
所以,我们都可以使用 80 端口配置,在配置时,使用子域名即可。
安装 Nginx 可参考 CentOS7 环境配置(持续更新) 文章。
nginx.conf 配置
1
2
3
4
5
6
7
8
9
10
11
12
13
14
15
16
17
18
19
20
21
22
23
24
25
26
27
28
29
30
31
32
33
34
35
36
37
38
39
40
41
42
43
44
45
46
47
48
49
50
51
52
53
54
55
56
57
58
59
60
61
62
63
64
65
66
67
68
| #user nobody;
worker_processes 1;
#error_log logs/error.log;
#error_log logs/error.log notice;
#error_log logs/error.log info;
pid /run/nginx.pid;
events {
worker_connections 1024;
}
http {
include mime.types;
default_type application/octet-stream;
sendfile on;
tcp_nopush on;
tcp_nodelay on;
fastcgi_buffers 8 128k;
send_timeout 60;
keepalive_timeout 100;
types_hash_max_size 4096;
client_header_timeout 180s;
client_body_timeout 180s;
client_max_body_size 200M;
client_body_buffer_size 256k;
#gzip on;
upstream test-server {
server localhost:8081;
}
server {
listen 80;
server_name test.muycode.com;
# 前端静态页面
location / {
root /home/opt/test;
index index.html index.htm;
}
# 配置多个静态资源
location /test2 {
# 不能使用 root,需要使用 alias
alias /home/opt/test2;
index index.html index.php index.htm;
}
# 后端服务
location /test-server/ {
root html;
index index.html index.htm;
proxy_pass http://test-server;
proxy_set_header x-forwarded-for $remote_addr;
}
}
server {
listen 80;
server_name muycode.com;
location / {
root /home/opt/blog;
index index.html index.htm;
}
}
server {
listen 80;
server_name book.muycode.com;
# book
location / {
root /home/opt/book;
index index.html index.htm;
}
}
}
|
重启 Nginx,systemctl start nginx
域名解析
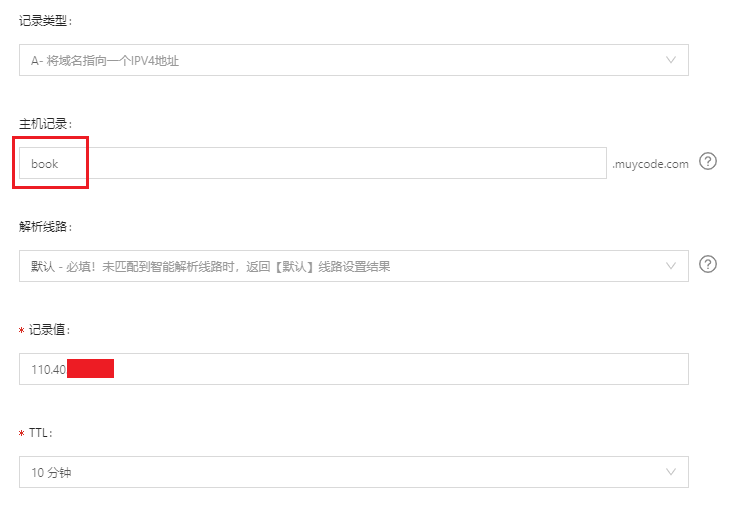
在配置好 Nginx 之后,再解析域名,只需填写子域名记录值和 IP 地址即可
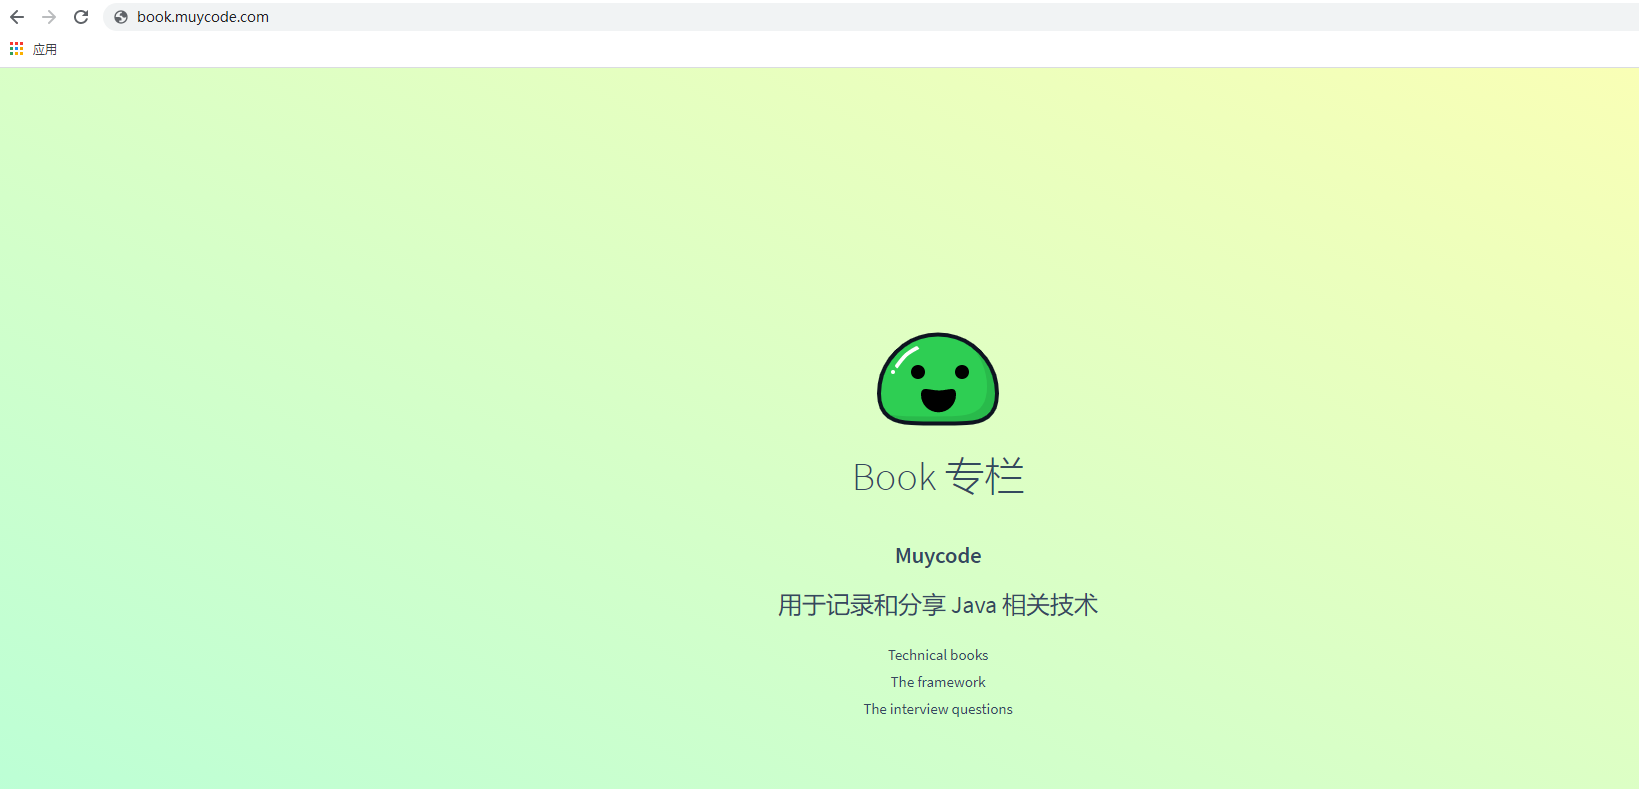
解析大概需要几分钟的延迟,然后再打开 http://book.muycode.com/ 即可访问。
配置 HTTPS
申请 SSL 证书
可以申请到免费 SSL 证书,这类证书,签发有效期为 1 年,并且都是单域名。阿里云为自然年,不是从签发日起的一年。
由于阿里云的免费签名已申请过,所以本次介绍都是以腾讯云为基础。
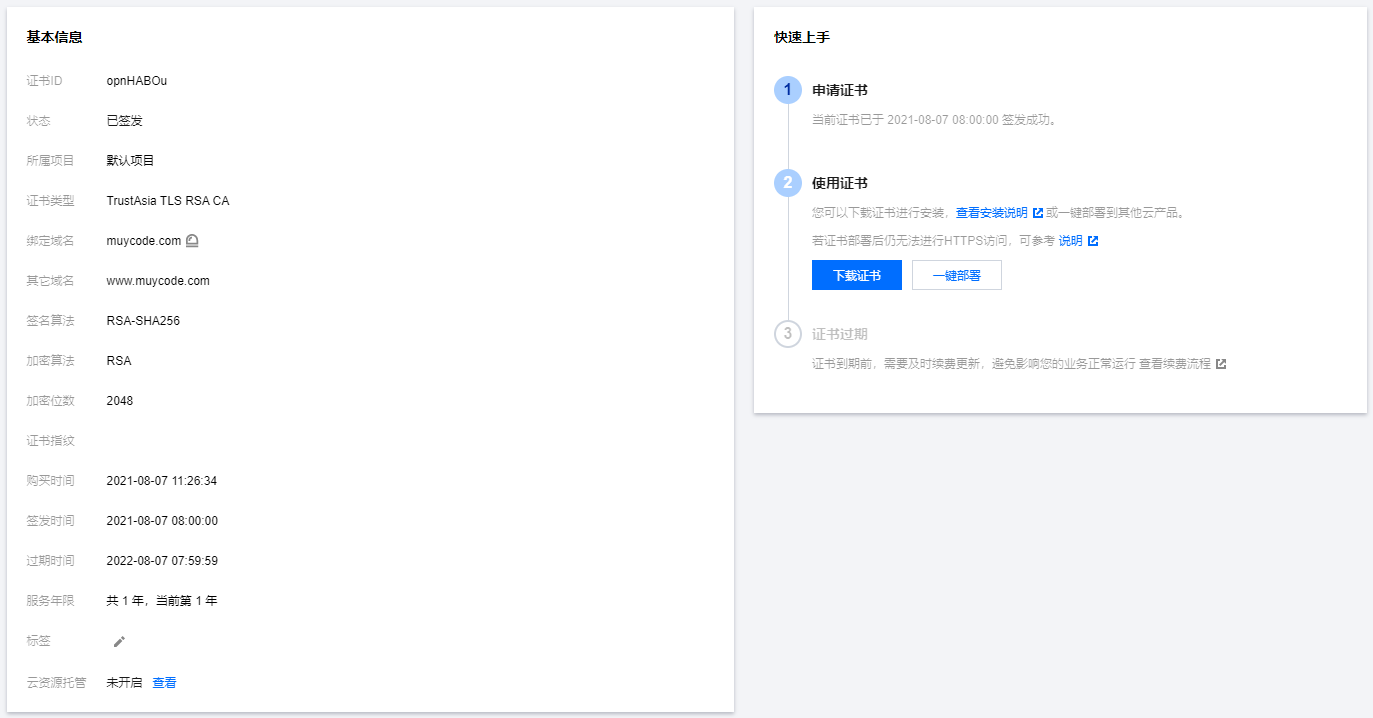
当申请完 腾讯云 SSL 证书 之后,通过 控制台,可以看到已申请的证书信息。
安装证书
通过右边 下载证书 按钮,把证书下载到本地,解压之后,可以看到在 Nginx 文件夹中,有两个文件
- 1_muycode.com_bundle.crt
- 2_muycode.com.key
把这两个文件上传到服务器 /etc/nginx/conf(nginx 安装目录),然后修改nginx.conf,由于是申请的免费单域名(包含一个子域名),所以打算把证书配置在muycode.com 域名上。
1
2
3
4
5
6
7
8
9
10
11
12
13
14
15
16
17
18
19
20
21
22
23
24
25
26
27
28
29
30
31
32
33
34
35
36
37
38
39
40
41
42
43
44
45
46
47
48
49
50
51
52
53
54
55
56
57
58
59
60
61
62
63
64
65
66
67
68
69
70
71
72
73
74
75
76
77
78
79
80
81
82
83
84
85
86
87
88
89
90
| #user nobody;
worker_processes 1;
#error_log logs/error.log;
#error_log logs/error.log notice;
#error_log logs/error.log info;
pid /run/nginx.pid;
events {
worker_connections 1024;
}
http {
include mime.types;
default_type application/octet-stream;
sendfile on;
tcp_nopush on;
tcp_nodelay on;
fastcgi_buffers 8 128k;
send_timeout 60;
keepalive_timeout 100;
types_hash_max_size 4096;
client_header_timeout 180s;
client_body_timeout 180s;
client_max_body_size 200M;
client_body_buffer_size 256k;
#gzip on;
upstream test-server {
server localhost:8081;
}
server {
listen 80;
server_name test.muycode.com;
# 前端静态页面
location / {
root /home/opt/test;
index index.html index.htm;
}
# 配置多个静态资源
location /test2 {
# 不能使用 root,需要使用 alias
alias /home/opt/test2;
index index.html index.php index.htm;
}
# 后端服务
location /test-server/ {
root html;
index index.html index.htm;
proxy_pass http://test-server;
proxy_set_header x-forwarded-for $remote_addr;
}
}
# 修改此处
server {
listen 80;
server_name muycode.com;
// 使用 rewrite 指令,使 http 跳转到 https
return 301 https://muycode.com;
#location / {
# root /home/opt/blog;
# index index.html index.htm;
#}
}
server {
listen 80;
server_name book.muycode.com;
# book
location / {
root /home/opt/book;
index index.html index.htm;
}
}
# 添加配置
# HTTPS server
server {
listen 443 ssl;
server_name muycode.com;
ssl_certificate conf/1_muycode.com_bundle.crt;
ssl_certificate_key conf/2_muycode.com.key;
ssl_session_cache shared:SSL:1m;
ssl_session_timeout 5m;
ssl_ciphers ECDHE-RSA-AES128-GCM-SHA256:HIGH:!aNULL:!MD5:!RC4:!DHE;
ssl_prefer_server_ciphers on;
location / {
root /home/opt/blog;
index index.html index.htm;
}
}
}
|
重启 Nginx,systemctl start nginx
验证 SSL
访问 http://muycode.com,会跳转到 https://muycode.com。
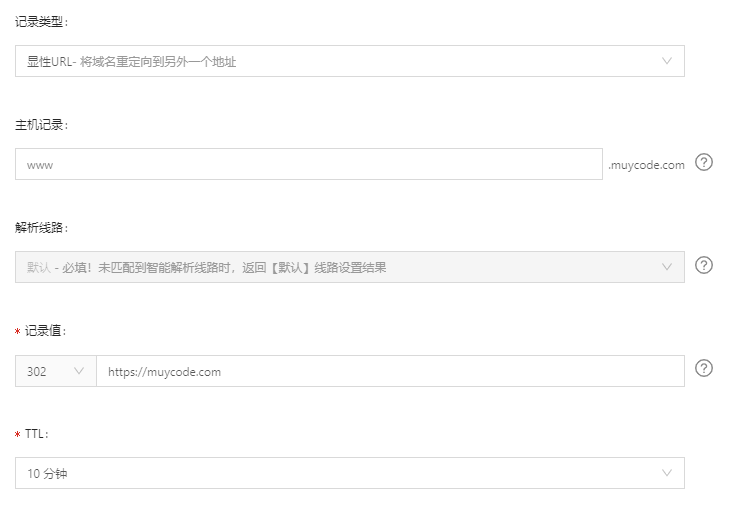
但是,当访问 http://www.muycode.com 时,还是不会变化。不过可以通过域名解析,使用 显性 URL 来做重定向。
至此,Nginx 和 SSL 配置都已完成!

 微信
微信 支付宝
支付宝